Creating a Static Website with AWS
Inspired by the Cloud Resume Challenge created by Forrest Brazeal
Establishing the Foundations - HTML & CSS
I would like to start off by saying that I am by no means a
professional web developer. With that in mind, I decided to
start with a template, reverse engineer it and then customize. I
got the template for this site from html5up.net and this
particular template is called "hyperspace". I spent more time on
this part of the project than I probably should have but what
can I say? Creative works are an outlet of mine. So, why not
give it the ol' razzle dazzle while I duct tape some things
together?

Link to template:
Hyperspace Template Demo by html5up.net
If you are curious about the artwork on the site (checkered orb
image, about me section background with the guy touching the
computer, the retro sun blog image and others) - they are some
of my creations. The perspective line artwork in the background
on the home section came with the hyperspace template.
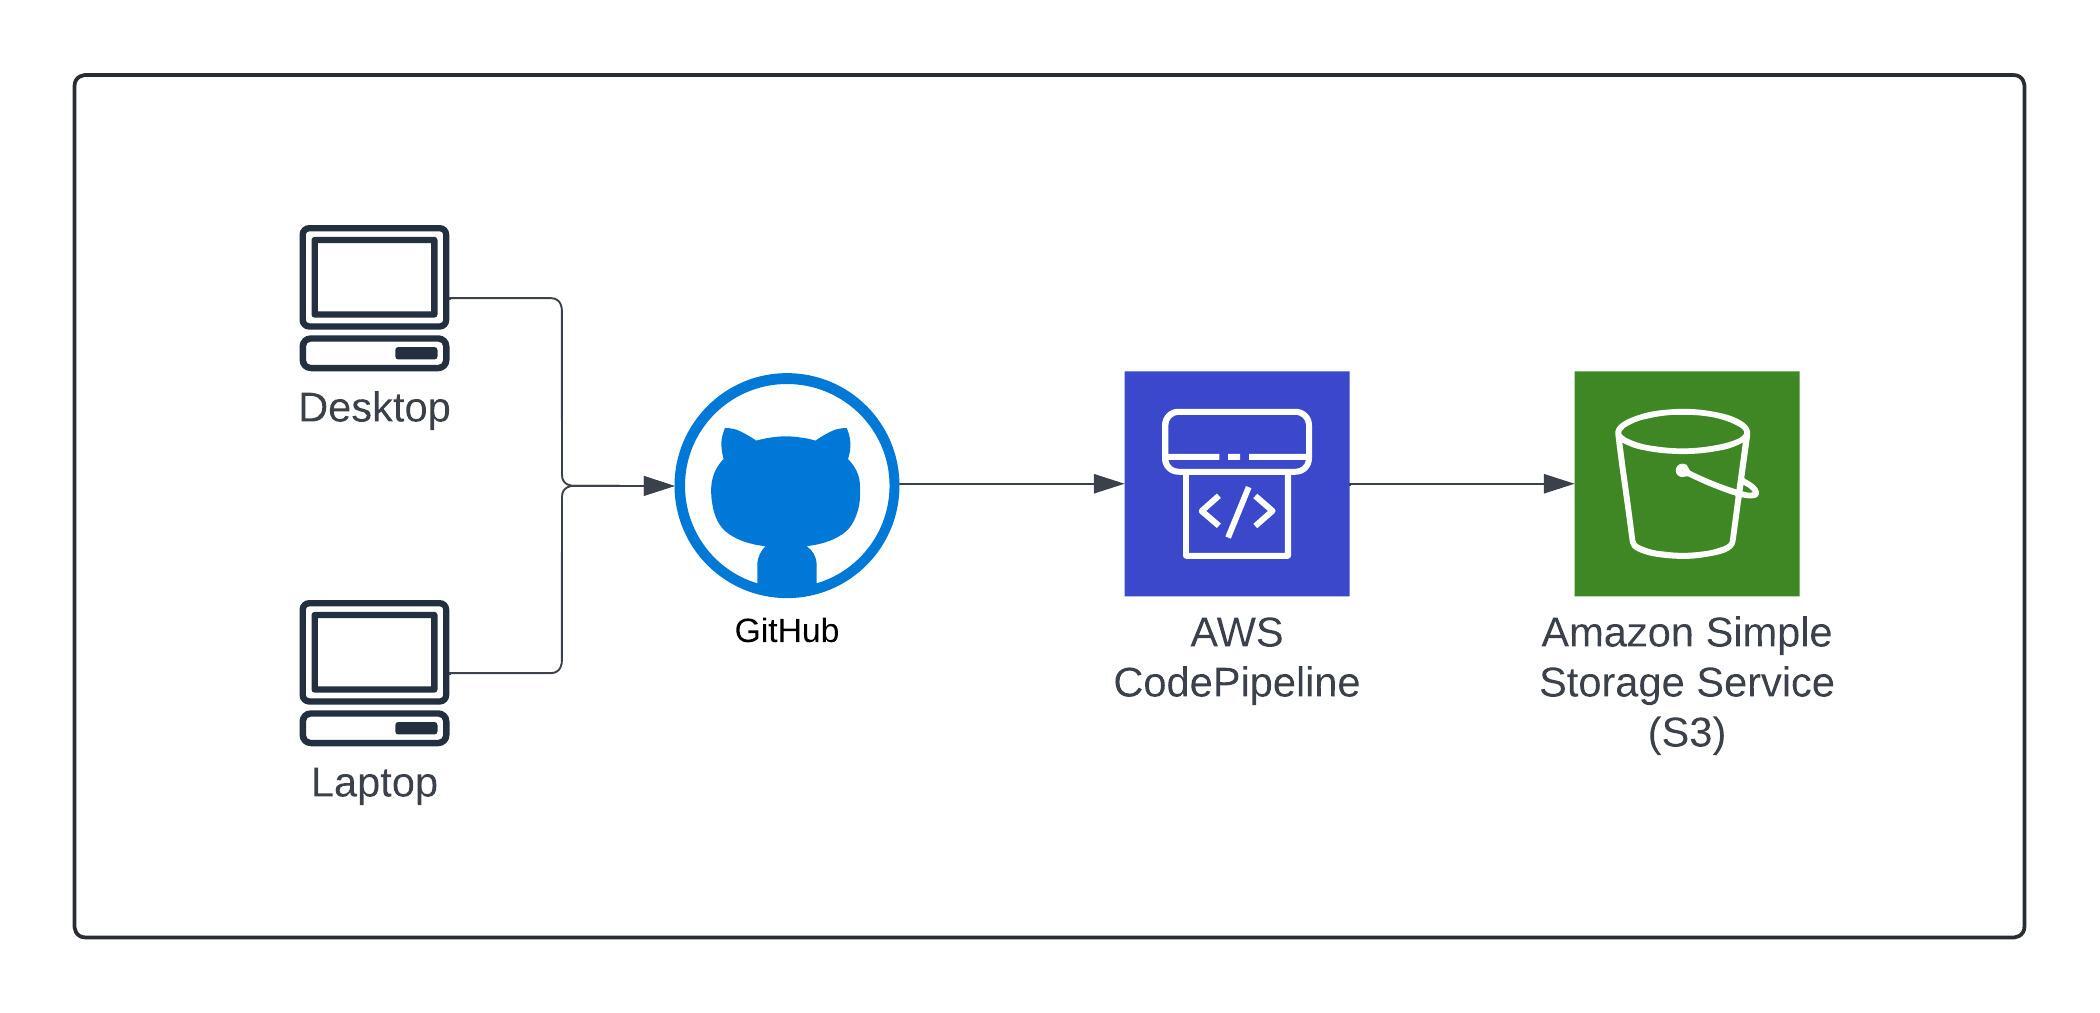
Initializing CI/CD - GitHub, AWS Codepipeline & S3
From the beginning of this project, I knew I needed to use CI/CD
to make sure that the project remained efficient from a
management perspective right from the start. Since I work from 2
different machines (desktop and laptop while on the go), I
needed my files to remain current & consistent on both machines
as I developed the bones of this site and to have the middleman
in place for when I pushed it to S3 (more on that later). I
chose GitHub for this since I already had some experience using
GitLab throughout my degree program recently and wanted to take
this opportunity to get more familiar with GitHub as well.
Once I had the foundation for the site laid out (main page, blog
page and this blogpost), I was ready to push the repository into
an S3 bucket. For this, I set up a code pipeline in AWS using
you guessed it... "AWS Codepipeline". This process is straight
forward as codepipeline can interact with GitHub directly for
the initial sync and listen for updates. With the codepipeline
set up, my repo was now placed in an S3 bucket and maintains a 1
to 1 replica of my repo. Making it easy and efficient to update
my pages

Any time I update my repo and push it to GitHub, AWS
Codepipeline will pull it and update my S3 bucket which will be
used as the origin for CloudFront.
Cloundfront & Enhancing CI/CD - AWS Cloudfront, Lambda, Codepipeline
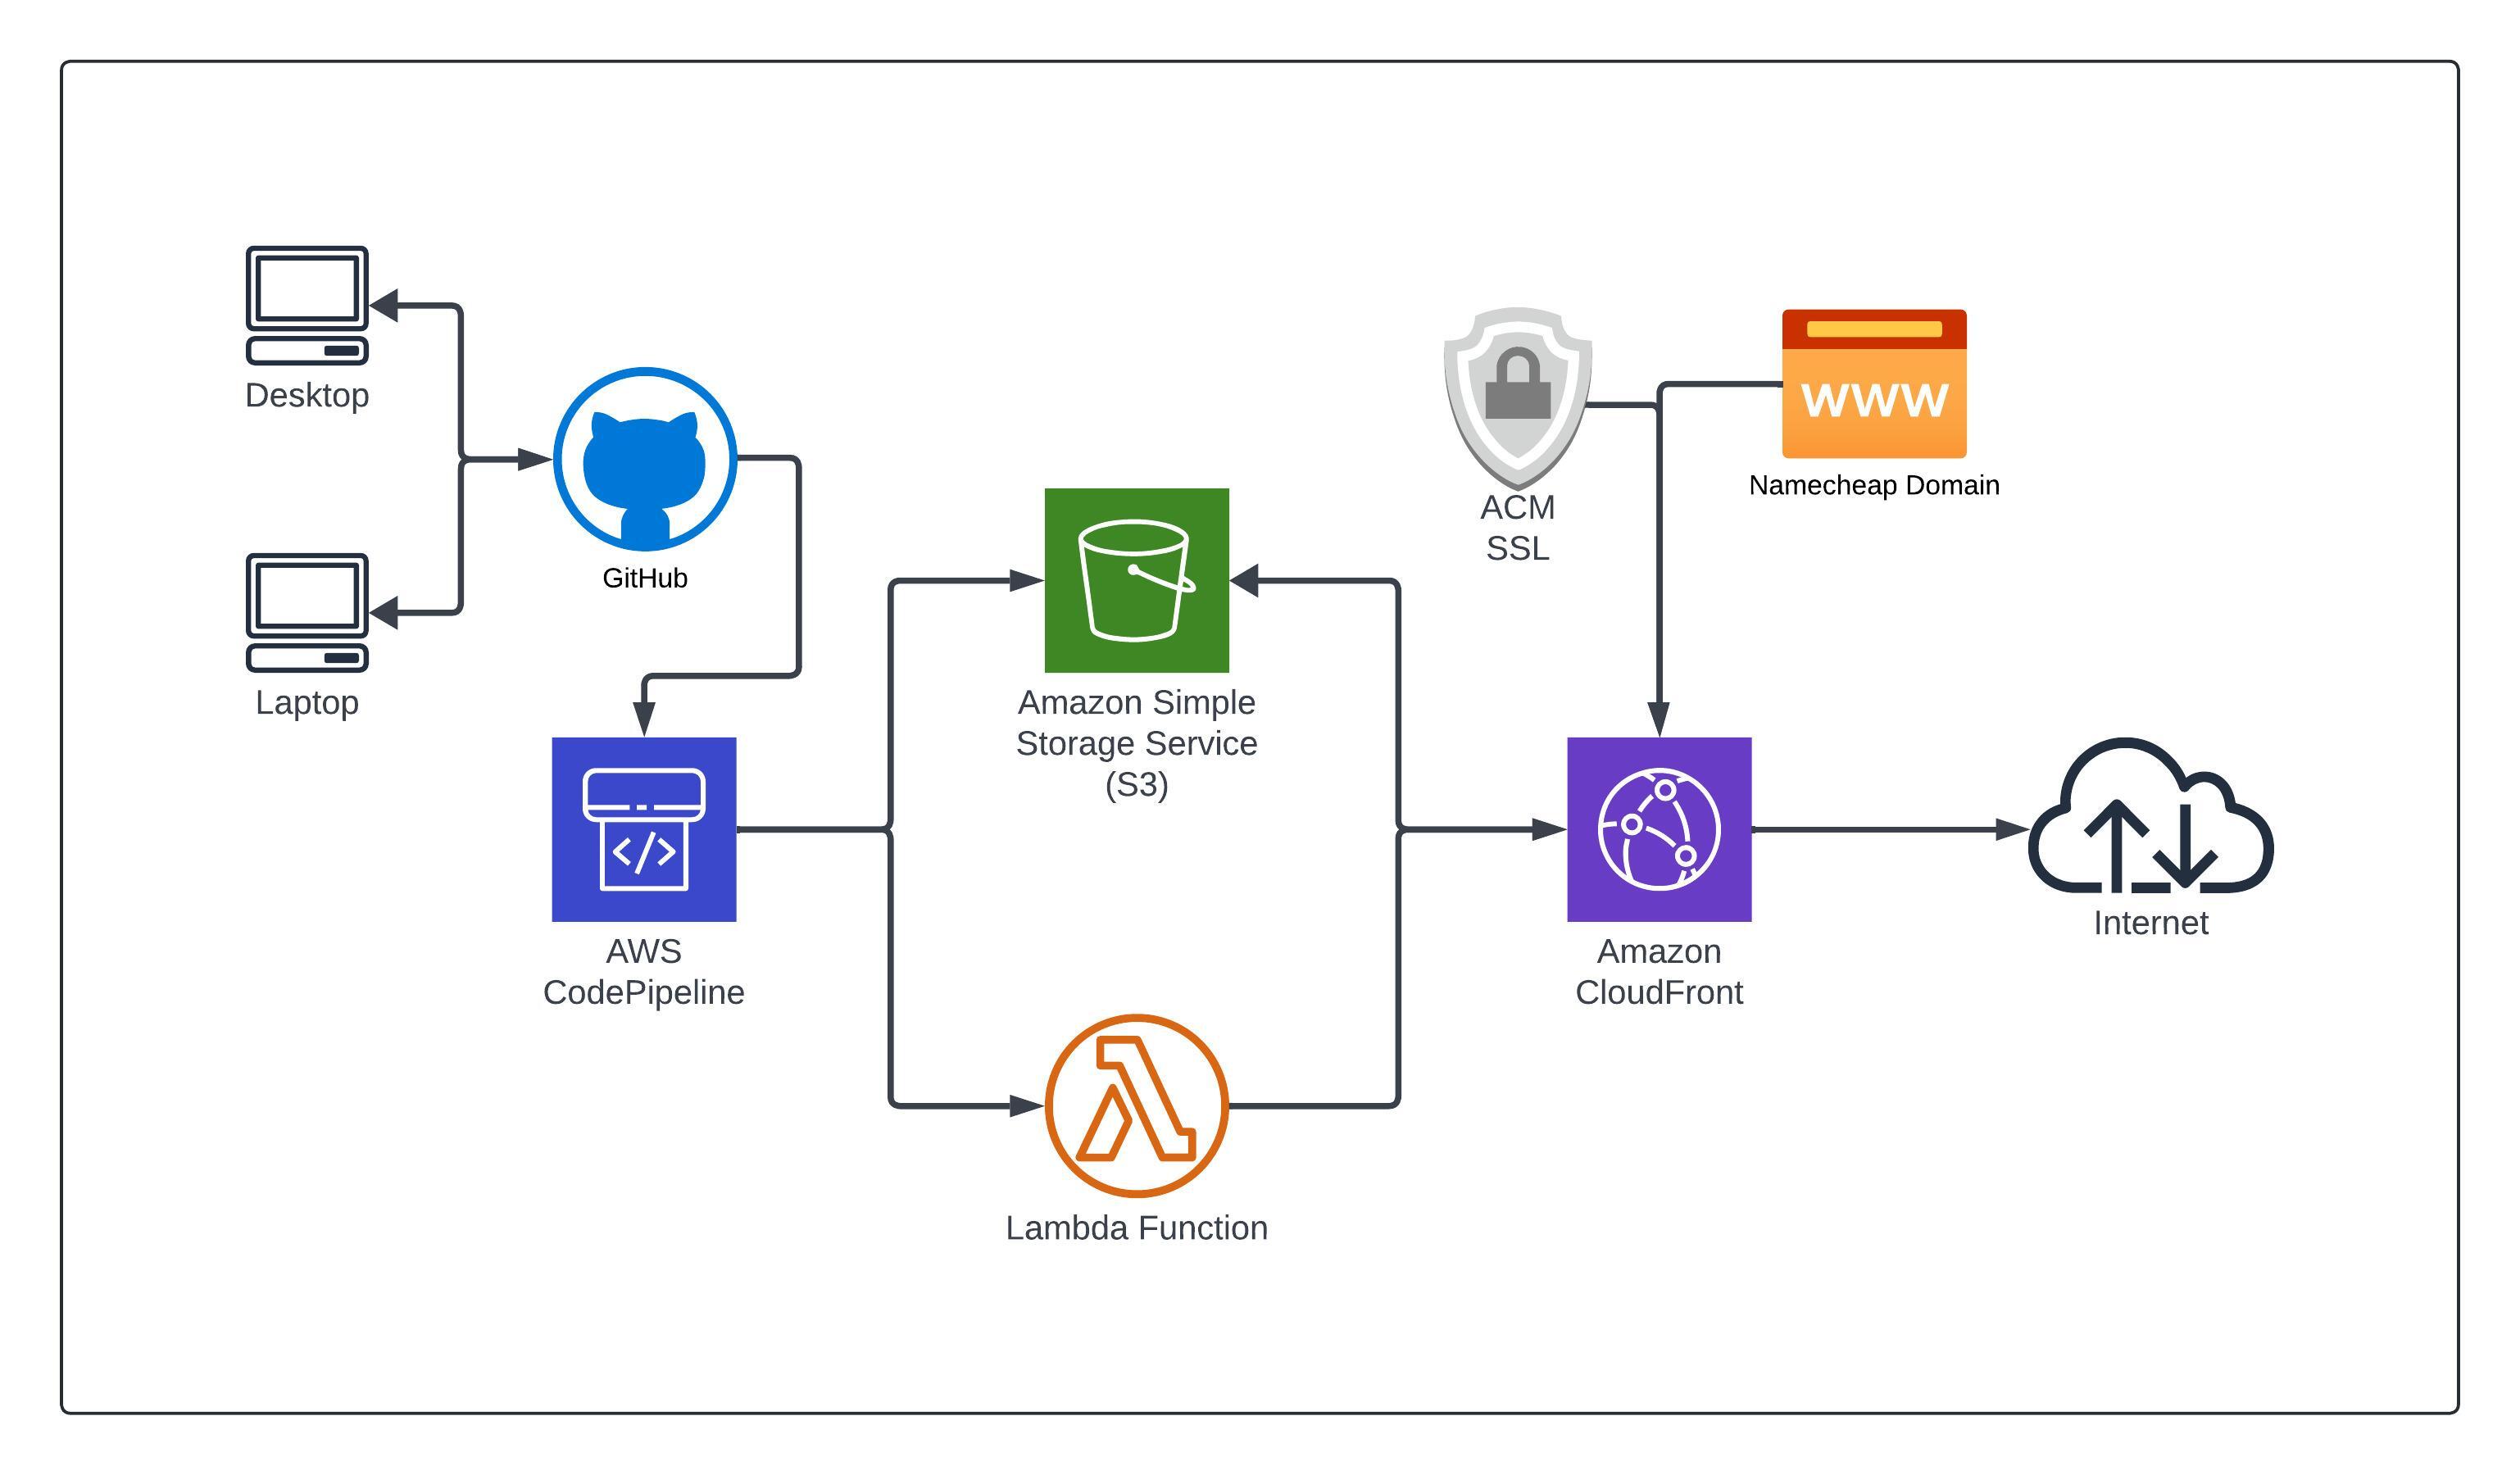
Now that I had my files synced to my GitHub repo, I needed to
create the Cloudfront Distribution to make my static site
available in a secure and efficient way. This means keeping my
origin S3 bucket private and allowing Cloudfront to do the
talking. In light of recent news ("The AWS S3 Denial of Wallet amplification attack") posted over on medium and all the backlash from it, I was certainly a little extra paranoid about how I am going about creating this project now... At this point, it meant making sure I selected a hard to guess S3 bucket name to keep my resources as private as possible and using that bucket going forward. Though there has been correspondence from AWS saying they are looking into resolving this issue. And I would hope we see some promising updates coming up after this much heat!
I decided to purchase my domain name through a 3rd party
(Namecheap) to isolate it from this particular AWS account in
case I want to easily move it some other day. Setting up the
distribution and plugging in my domain was fairly
straightforward as there are reputable guides from both AWS and
Namecheap for this. Once my domain was registered, I used ACM
(Amazon Credential Manager) to procure the SSL certificate. With
the domain and SSL in hand, I added them to the Cloudfront
distro configuration & made the corresponding records in
Namecheap.
With the Cloudfront distro up and running fine, there was a
tweak I wanted to make to increase the QoL while working on this
project/website. The CICD enhancement is automating the
Cloudfront cache invalidations when the S3 bucket gets fresh
files from GitHub in the Codepipeline.
To accomplish the automated Cloudfront invalidations, I added an
additional stage to the Codepipeline after the s3 bucket gets
populated. This additional stage runs a Lambda function that
does the heavy lifting for this automation. The Lambda function
itself contains code sourced from a GitHub repo posted by the
user "dhruv9911". The code is setup to use user parameters for
the Cloudfront ID and paths to be invalidated, which can be set
within the action group of the codepipeline stage. With this
Lambda function and additional codepipeline stage in place. The
entire CI/CD process is automated and every update that I make
to the site gets pushed to Cloudfront as soon as updated files
arrive in the S3 bucket.
Link to Lambda code:
"Cloudfront-Invalidation by dhruv9911"
Completed AWS Static Website Architectual Diagram & Conclusions

This current version of the static site project was mostly me
winging it with some things and using the AWS console a good
bit. Next, I plan to redo the setup now that I have the base
layer for the site and can focus on a more streamlined and
professional AWS integration. With version 2, I plan to use the
CLI and IaC more to set things up, explore different CI/CD
routes and implement new features. Once version 2 is rolled out,
this project will be superseded and that will replace the main
project tile on the home page but I'll probably keep this blog
post for it here as documentation of my journey in the blog
portion of the site.
In the long run, I am not sure if I will continue to use a
static site or eventually cave in and use a more robust
CMS/dynamic solution. Only time will tell. For now and the
foreseeable future, I hope you enjoy your stay here at the
static mikesnell.cloud.
- Mike Snell

